
In this tutorial I will show you my way of connecting Max/MSP to my DAW of choice – Cakewalk SONAR – and also an approach to handling multi-channel MIDI information coming to Max/MSP over from the DAW. My idea was to use Max/MSP for creating instruments which would then be controlled by the SONAR’s sophisticated MIDI sequencer to which I am more than used to. While it wasn’t particularly hard to achieve this goal, there are some quirks to the approach I would like to point out.
The Max/MSP patch I am building for this is fairly simple and uses only the basic objects Max has to offer. I would thus recommend even to the complete beginners in Max/MSP as it offers great results and is very easy to understand and build.
Please note that I am by no means an expert in Max/MSP and thus there may be much better ways to achieve the same or better result. This is simply my way of doing this. By all means please comment if you have better understanding of the subject and can offer more effective solutions.
CTLIN Versus NOTEIN
The two objects used to send MIDI data from the DAW to Max/MSP are notein and ctlin. Object notein receives MIDI events and can output the pitch, velocity and channel of the event, while ctlin receives MIDI controller data and outputs the value (0-127), controller number and its MIDI channel.
The reason why I use the latter and not the former is that it seems that ReWire in SONAR can only have a single MIDI channel:
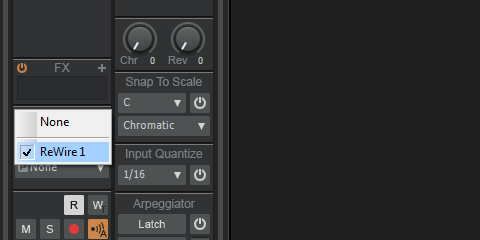
This creates two problems in case you have more than one MIDI channel sending data as 1) you cannot separate incoming MIDI events by channels in Max/MSP and 2) the onset of a new event in any of the channels interrupts performance of the ongoing event in another channel (hence effectively disabling polyphony). Now, this may be different in other DAWs and I will in fact test this in the future, but for now it’s more convenient for me to use MIDI controllers as these do not face these obstacles when using Max/MSP ReWired to SONAR.
MIDI Controller Data
Different MIDI controllers are easily differentiated by their numbers as they are set in SONAR. CC01 is usually Modulation, CC02 is Breath Controller, and so on (these do not have any pre-defined meaning when sending them to Max/MSP as only their numbers count). An easy way of achieving polyphony thusly is by writing layer upon layer of different numbered CC data which are then routed to appropriate inlets upon their arrival to Max/MSP. The only rule I’ve noticed in numbering these – and it is only a rule of convenience, not mandatory! – is that the numbers should steadily increase (i. e. “1, 2, 3”, not “1, 2, 95”). Why this is so, we will see later.
Here’s a short loop I prepared using three controller lanes:
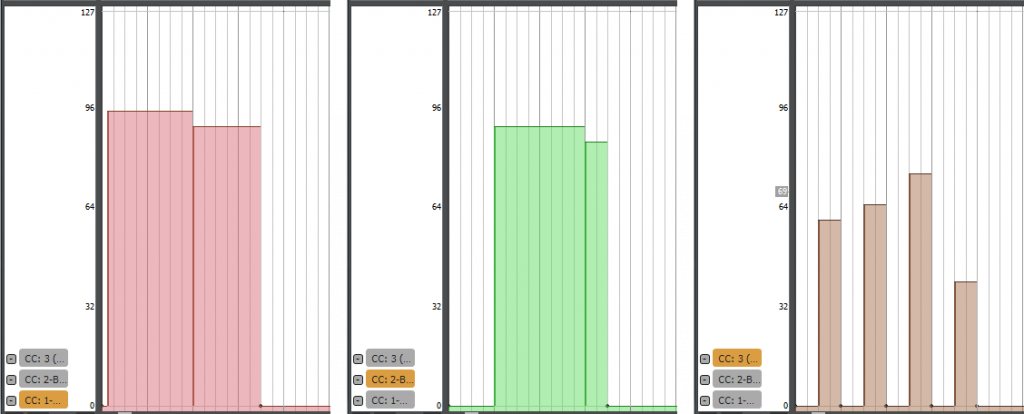
One important thing to note while writing such sequences – MIDI controllers do not have end times as data attached to their events, unlike regular MIDI events. It is thus necessary to write in end points to your values separately, which is what is happening in the third picture with each of the four notes having rests written after them.
All of these should be written into the MIDI track created upon inserting the Max/MSP ReWire instrument via Insert\ReWire Device\Uncategorized\Max 7 (actual path may vary but it’s certainly under Insert in Cakewalk SONAR).
Grabbing the Data in Max/MSP
Once Max/MSP ReWire device is created in SONAR and the MIDI CC data typed in, it’s time to start up Max/MSP and create a new patch. First of all, to make any of this work, you should bring up Options\Audio Status and select the ReWire device as your driver (in my case it’s “ad_rewire” but yours may be named differently) and make sure the audio engine is running (the big switch in the upper left corner).
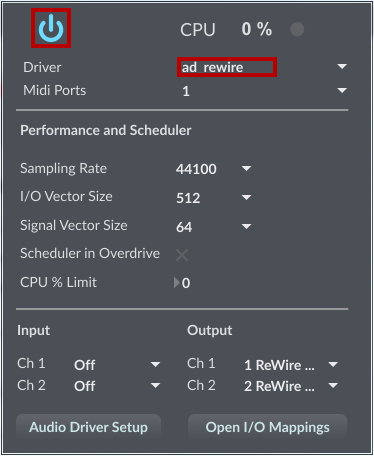
Once that is done, we’re ready to create our patch.
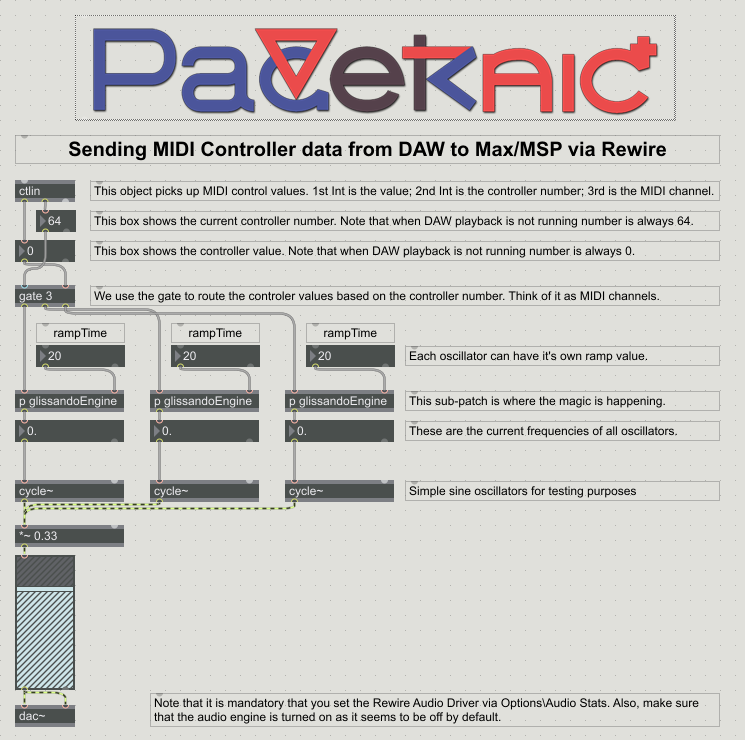
The Max/MSP Patch
First of all we need the ctlin object which receives the CC data sent by the DAW. For monitoring purposes attach two integer boxes to its outputs #1 and #2 so that you can watch the numbers change as the playback within DAW cycles in a loop. Below is a pic of how it looks on my end.

The next step is to route all those CC inputs according to their numbers as we will certainly want different controllers to do different things. The way I do it is by using gate with as many outputs as there are controllers. This is why I said it’s best to use steadily increasing numbers as it is most practical thing to have on screen (why have 95 outputs if you will only use three). As is visible on the image below, output #2 of the ctlin object controls which gate is open, and the associated CC value is then passed along the appropriate path.

This is where this tutorial could end basically. The data is received and directed to different outputs based on their controller numbers. However, before passing this data onwards to the oscillators I decided to include a basic glissando engine which could be used either for long glides between pitches or simply for preventing nasty clicks and artifacts at points where CC values change. This is handled via sub-patch I called glissandoEngine and I will describe it more detail next.
The glissandoEngine Sub-Patch
The idea behind this is fairly simple – we want smooth glissandos between value changes in our controller data instead of sudden jumps which is how things are by default. The approach is not remarkable though, again, there are some quirks one should be careful with. Here is how I solved some of the problems I faced.
We start out with an inlet receiving the controller values from the main patch. This value is then sent to a trigger which first outputs that same value and then the bang which is used later – more on that when we get to that.
The integer then enters a select object which checks if it is equal to zero or not. This is one of the quirks I mentioned earlier – my first approach was simply to send integers to mtof objects, expecting them to return frequency zero in case of receiving zero integers. However, this was not the case as zero integers translate to some 8. Hz when passed through mtof, which effectively makes the rests not silent (especially audible when using phasor~). Thus I had to check the incoming integers and in case of zero (i. e. rests) I would send them directly to the float outputs without passing them through mtof. The non-zero integers would of course be run through mtof and then passed to float outputs. The result is visible in the float box below the mtof object.
In order to have a glissando ramp at all we need a line~ object driven by an appropriate message. This message has to be in such a format: “starting value”, “end value” “time ramp”. This translates to: “change value from starting to end within time ramp period”. The tricky part is that what is at the moment “end value” should immediately after become “start value” for the next glissando – this is achieved by using triggers and floats to store and send out values at appropriate time.
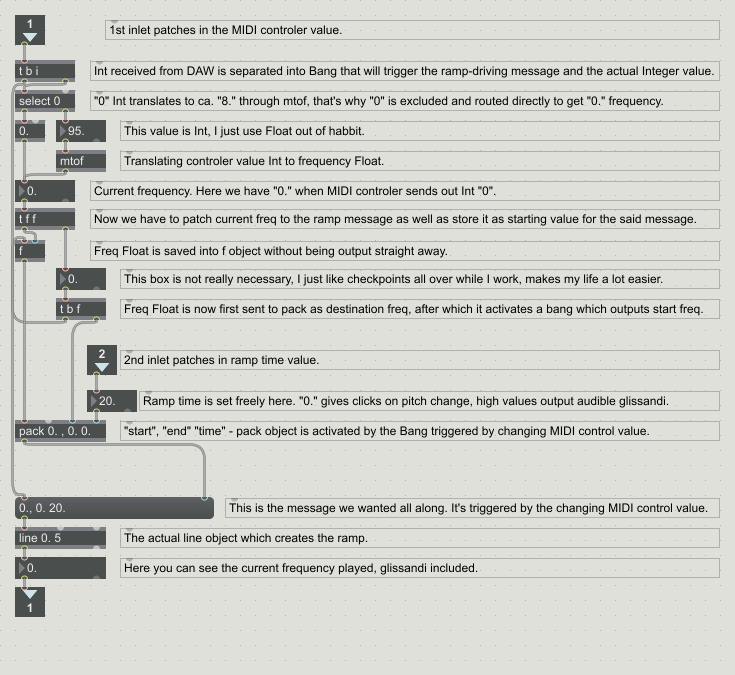
First of all, after the float box showing the current frequency there is a trigger which sends out two floats one after the other. The right output is sent out first and it first enters a float number box which I use simply for control. Afterwards, the float goes to another trigger which sends out a float and a bang. Float enters input #3 of our pack object (more on this shortly!) and the bang is sent elsewhere (more on that shortly as well!). The left output of the earlier trigger is sent to a float’s RIGHT output and is thus simply stored and NOT fired out right away. What forces this value through the output is the bang we mentioned just a moment ago – what is important is that this happens only once all other values necessary for the pack object are in place as relasing this float completes the puzzle and also triggers the pack object into action.
Now, regarding the pack object… Its arguments are “0. , 0. 0.” – note that there are FOUR values, as comma also counts as an argument. This is the skeleton for the message we talked about earlier: “starting value”, “end value” “time ramp”. Let’s go from right to left, the Max/MSP way! Fourt (right-most) of all, we have time ramp value which is actually sent independently from the main patch and which controls how long glissandi last. Third, we have the end value which is the most recent float received from the main patch as CC integer and processed within the sub-patch. Second input is the one opened by our comma – no input goes here as we want our comma never to change. Finally, the first input is the starting value, i. e. the value previously received and the one that is still being output to the main patch (this is made possible by storing it within float object and only outputing it with a bang sent out by the most recent float arriving from the outside). Finally, our pack is flushed out into our message’s RIGHT output, as we don’t want this to trigger the message but instead set its contents.
The message itself is triggered by the bang routed from a trigger hit by the integer coming in from the main patch. What this achieves is that the whole right side of the sub-patch is first performed, and only then is the glissando initated by this one bang. The message then goes to the line object and then goes back out to the main patch.
Outputing the Glissandi
In this simple example I have used three CC lanes and thus have three instances of the glissandoEngine and associated controls. This data is sent to three oscillators and then to the output via gain~ object. As I said, these flows may be used for all kinds of purposes, but it’s fairly easy to take it from here once you know the basics and what exactly you want to achieve.
Conclusion
I hope I helped clarify some of the problems associated with ReWiring MIDI data from DAWs to Max/MSP. As I said before, there may be better approaches to this – this is simply how I prefer to do it at the moment. If you have any questions or comments, please feel free to write.
In case you would like to take a look at the Max/MSP 7.2.0 patch or SONAR Platinum 23.5.0 B32 project file, you can find them here: https://drive.google.com/open?id=1BMbpK2FlsS063CELmDRvODUbMVYOjQZ7
In case you want this whole tutorial as a PDF, you can have it here: https://drive.google.com/open?id=1jfIy7DHw1rKr1RwLyfZyKYbb1B-iU2Vm
Have fun with ReWire!